
Ein Kraken macht Druck
Nach dem ich mir letztes Jahr einen Creality3D CR-10 3D-Drucker zugelegt habe, soll dieser heute einen Octoprint Druckserver bekommen, natürlich mit einem eigenen Display, damit man nicht ständig den PC anwerfen muß, um mal wieder ein „Benchi“ zu Vorführungszwecken zu drucken.
Als Hardware-Komponenten habe ich mir folgende Teile zusammen gesucht.
| Raspberry 3B+
Obwohl es ja aktuell den Raspberry Pi 4 schon gibt, habe ich mich bewußt für den Raspberry Pi 3B+ entschieden. Seine Leistungsdaten reichen vollkommen für die Realisierung des Projektes aus. |
|
| Waveshare 5 Inch Display | |
| Netzteil mit Schalter | |
| 32GB MircoSD (oder größer) | |
| Gehäuse von Thingverse | Thing:3679054 |
| Schrauben und Kleinteile |
Das Waveshare 5″ Display hatte sich bei anderen Projekten schon als sehr brauchbares Touchdisplay erwiesen.
Als erstes muss die OctoPrint OctoPi-Druckserver Software herunter geladen werden. Das Installationspaket kann auf der Projekt-Website heruntergeladen werden. Ich beziehe mich in der Anleitung hier auf die Version 0.17.0. Ein kurze Anleitung, wie man das Image auf die Speicherkarte bekommt, findest Du auch auf der Projekt-Website.
So bin ich vorgegangen.
Im Download-Verzeichnis liegt die Datei octopi-buster-lite-0.17.0.zip. Die Datei wird ausgepackt und man bekommt die Image-Datei2019-09-26-octopi-buster-lite-0.17.0.img. Diese Image-Datei wird mit einem entsprechenden Tool auf die MicroSD-Karte geschrieben.
Jetzt kann die eigentliche Konfiguration des OctoPrint Server (OctoPi) beginnen.
Bevor die MicroSD-Karte im Raspberry verbaut wird, müssen noch zwei Dateien bearbeitet werden. Das geht einfacher auf dem PC/Mac.
Als erstes ist die config.txt an der Reihe.
Die Datei sollte wie folgt aussehen:
# For more options and information see
# http://rpf.io/configtxt
# Some settings may impact device functionality. See link above for details
# uncomment if you get no picture on HDMI for a default "safe" mode


#hdmi_safe=1


# uncomment this if your display has a black border of unused pixels visible
# and your display can output without overscan


#disable_overscan=1


# uncomment the following to adjust overscan. Use positive numbers if console
# goes off screen, and negative if there is too much border

#overscan_left=16
#overscan_right=16
#overscan_top=16
#overscan_bottom=16


# uncomment to force a console size. By default it will be display's size minus
# overscan.

#framebuffer_width=1280
#framebuffer_height=720

# uncomment if hdmi display is not detected and composite is being output

#hdmi_force_hotplug=1

# uncomment to force a specific HDMI mode (this will force VGA)

#hdmi_group=1
#hdmi_mode=1

# uncomment to force a HDMI mode rather than DVI. This can make audio work in
# DMT (computer monitor) modes

#hdmi_drive=2


# uncomment to increase signal to HDMI, if you have interference, blanking, or
# no display

#config_hdmi_boost=4


# uncomment for composite PAL
#sdtv_mode=2


#uncomment to overclock the arm. 700 MHz is the default.
#arm_freq=800


# Uncomment some or all of these to enable the optional hardware interfaces


#dtparam=i2c_arm=on
#dtparam=i2s=on
#dtparam=spi=on


# Uncomment this to enable infrared communication.


#dtoverlay=gpio-ir,gpio_pin=17
#dtoverlay=gpio-ir-tx,gpio_pin=18


# Additional overlays and parameters are documented /boot/overlays/README

# Enable audio (loads snd_bcm2835)
dtparam=audio=on


[pi4]

# Enable DRM VC4 V3D driver on top of the dispmanx display stack

dtoverlay=vc4-fkms-v3d
max_framebuffers=2


[all]

#dtoverlay=vc4-fkms-v3d
# enable raspicam

start_x=1
gpu_mem=128
Die grün markierten Zeilen/Bereiche müssen jetzt wie folgt angepasst werden (orange):
# uncomment the following to adjust overscan. Use positive numbers if console
# goes off screen, and negative if there is too much border

overscan_left=16
overscan_right=16
overscan_top=16
overscan_bottom=16


# uncomment to force a specific HDMI mode (this will force VGA)

#hdmi_group=1
#hdmi_mode=1

hdmi_group=2
hdmi_mode=87
hdmi_cvt 800 480 60 6 0 0 0

# uncomment to force a HDMI mode rather than DVI. This can make audio work in
# DMT (computer monitor) modes

#hdmi_drive=2
hdmi_drive=1


[pi4]

# Enable DRM VC4 V3D driver on top of the dispmanx display stack

# dtoverlay=vc4-fkms-v3d
max_framebuffers=2
Jetzt muß noch die Datei octopi-wpa-supplicant.txt bearbeitet werden. Sie enthält die Informationen für den WLAN Zugriff. Wenn Du den Raspberry Pi über Netzwerkarte ans Netz anbinden willst, muss die Datei nicht geändert werden.
# Use this file to configure your wifi connection(s).
#
# Just uncomment the lines prefixed with a single # of the configuration
# that matches your wifi setup and fill in SSID and passphrase.
#
# You can configure multiple wifi connections by adding more 'network'
# blocks.
#
# See https://linux.die.net/man/5/wpa_supplicant.conf
# (or 'man -s 5 wpa_supplicant.conf') for advanced options going beyond
# the examples provided below (e.g. various WPA Enterprise setups).
#
# !!!!! HEADS-UP WINDOWS USERS !!!!!
#
# Do not use Wordpad for editing this file, it will mangle it and your
# configuration won't work. Use a proper text editor instead.
# Recommended: Notepad++, VSCode, Atom, SublimeText.
#
# !!!!! HEADS-UP MACOSX USERS !!!!!
#
# If you use Textedit to edit this file make sure to use "plain text format"
# and "disable smart quotes" in "Textedit > Preferences", otherwise Textedit
# will use none-compatible characters and your network configuration won't
# work!


# WPA/WPA2 secured
#network={
#  ssid="put SSID here"
#  psk="put password here"
#}


## Open/unsecured
#network={
#  ssid="put SSID here"
#  key_mgmt=NONE
#}


## WEP "secured"
##
## WEP can be cracked within minutes. If your network is still relying on this
## encryption scheme you should seriously consider to update your network ASAP.

#network={
#  ssid="put SSID here"
#  key_mgmt=NONE
#  wep_key0="put password here"
#  wep_tx_keyidx=0
#}


# Uncomment the country your Pi is in to activate Wifi in RaspberryPi 3 B+ and
# above. For full list see: https://en.wikipedia.org/wiki/ISO_3166-1_alpha-2

country=GB # United Kingdom
#country=CA # Canada
#country=DE # Germany
#country=FR # France
#country=US # United States


### You should not have to change the lines below #####################

ctrl_interface=DIR=/var/run/wpa_supplicant GROUP=netdev
update_config=1
Die grün markierten Bereiche müssen wie folgt angepaßt werden:
# WPA/WPA2 secured
network={
  ssid="Mein WLAN SSID"
  psk="MeinPa$$wort"
}
# Uncomment the country your Pi is in to activate Wifi in RaspberryPi 3 B+ and
# above. For full list see: https://en.wikipedia.org/wiki/ISO_3166-1_alpha-2

#country=GB # United Kingdom
#country=CA # Canada
country=DE  # Germany
#country=FR # France
#country=US # United States
Nach dem Speichern kannst Du die SD-Karte in den Raspberry stecken und starten. Auf dem Bildschirm sollte ein normaler RaspBerry-Bootvorgang zu sehen sein. Am Ende sollte auch eine IP-Adresse angezeigt werden, unter der der PI zu erreichen ist.
Sollte hier nichts zusehen sein oder keine IP-Adresse zu sehen sein, musst Du die Konfigurationsdateien noch einmal prüfen. Achte darauf das alle notwendigen # gelöscht sind.
Jetzt melden wir uns mit Putty auf der angezeigten IP-Adresse an.
Der Benutzer ist: pi
Das Passwort ist: raspberry
Um eventuellen Problemen aus dem Weg zu gehen, bringen wir den PI auf aktuellen Stand.
sudo apt-get update
sudo apt-get upgrade
Nach dem Update-Vorgang sollte ein
sudo reboot
ausgeführt werden. Jetzt ist der Raspberry auf aktuellem Stand.
Jetzt müssen wir erst einmal aus dem Raspberry Pi einen OctoPi machen. Wir wechseln auf einen Webbrowser und geben die IP-Adresse oder den URL: „https://octopi.local“ ein.
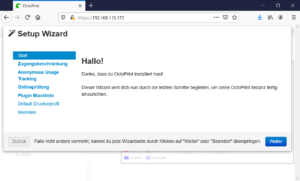
Es wird ein Setup Wizard angezeigt. Führe ihn durch und schon haben wir einen OctoPi (fast)fertig.
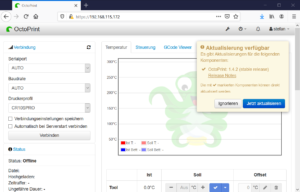
Als nächstes wird ein Update angezeigt. Dieses muss ebenfalls installiert werden.
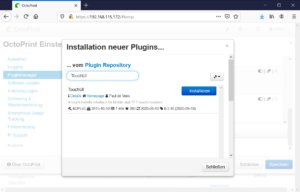
Der OctoPi Server startet sich neu. Nach der Anmeldung muss jetzt noch ein Addon geladen werden. Klicke dazu auf den Schraubenschlüssel im Menü. ![]()
Scroll unter PLUGINMANAGER ganz nach unten und klick auf MEHR und

suche das Plugin TouchUI und installiere es.
Im Anschluss sollte ein Neustart des Printserver durchgeführt werden.
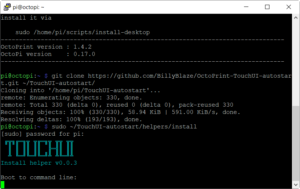
Jetzt müssen wir uns wieder mit dem Putty anmelden und folgende Installation durchführen.
git clone https://github.com/BillyBlaze/OctoPrint-TouchUI-autostart.git ~/TouchUI-autostart/

sudo ~/TouchUI-autostart/helpers/install
Das Installations-Script führt jetzt eine XServer installation durch.
Außer das man vielleicht Usernamen und ein Passwort eingeben muss, ist die Installation recht einfach und unspektakulär. Wichtig ist, das Script NICHT zu unterbrechen, Putty zu schließen oder ähnliches.
Am Ende muss der Octoprint-Server neugestartet werden. Auf dem Display sollte eine Web-Oberfläche angezeigt werden.
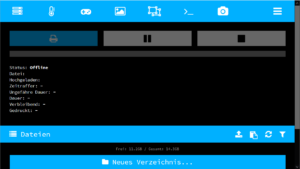
Wenn man jetzt noch Maus und Tastatur am OctoPi angeschlossen hat, kann man theoretisch die ersten Druckaufträge an den Druckserver schicken.
3D-Drucker über USB anschließen und es kann losgehen.
Aber wir wollen den OctoPi ja über Touch(UI) benutzen. Also muss der Touchtreiber von Waveshare installiert werden.
Als erstes führen wir über Putty ein
sudo reboot
durch.
Nach dem reboot, melde Dich mit Putty an und führe folgende Befehle aus.
git clone https://github.com/waveshare/LCD-show.git
cd LCD-show/
chmod +x LCD5-show
./LCD5-show
Nach der Installation der Treiber wir ein Reboot durchgeführt.
Jetzt ist der Druckserver einsatzbereit.
Die Installation und die Einrichtung hat ca. 30 Minuten gedauert.
Jetzt kann ich nur noch viel Spaß mit dem OctoPi wünschen.